Even a perfect composition will sound bad with a muddy mix, so corrective EQ tactics are absolutely essential to getting the right sound. Follow these 5 steps to cleaning up your mix and getting each track to shine through with clarity.
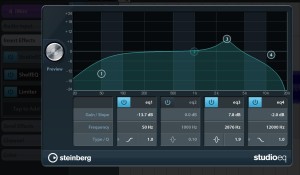 Emphasize What Matters: Open up your equalizer and figure out where the meat of each sound sits. You’ll notice that your sub-bass peaks at the very low end of the spectrum so any high end frequencies you let through are not serving a useful purpose. In fact, they’re just taking up space and competing with your other sounds. Similarly, any low frequencies you let through from your hi-hat track are just going to interfere with your lower sounds, resulting in a muddy mix. Go one by one through your tracks and carve out unnecessary frequencies to give each track its own space to shine.
Roll Off Highest Frequencies: Even sounds that are supposed to live on the high end of the frequency spectrum can use some high-end roll-off. The idea is to take away some of the very highest inaudible frequencies that can make things muddy. Here, less is more — you don’t want to roll off important high frequencies that might add to the atmospheric feeling of your song. Just roll off enough until you can start to hear the difference and then back off slightly.
High-Pass (Almost) Everything: The more room you leave in your low end of the spectrum, the better your sub can break through the mix. It’s really as simple as that. A hi-hat lives in the upper frequencies, so don’t let low-frequency audio fragments compete with your sub bass. There’s no hard and fast rule for high-passing everything, but you can roll off the lowest 60 Hz on most tracks without a problem. Of course, your hi-hats will need more roll-off while your vocals and bass will need less.
Notch Out Problem Frequencies: Within the important range of a sound, there are often “problem frequencies,” or tiny frequency bands that give uncomfortable resonances. Use the notch band in the EQ like a surgeon would and cut out those problem frequencies to give your audio a fresh makeover. The easiest way to do this is to play the track and then slowly sweep through it with one high peak in your EQ until you get to something that makes you cringe. Notch that frequency out and move on to the next one.
EQ Tracks in Tandem: Arguably, the two most important components of any EDM song are the bass and the kick. If those two aren’t sitting well together in the mix, no amount of work will make your song sound good. But getting sounds to mesh well together is as much an art as it is a science — you’ll need to experiment by subtly boosting some frequencies and lowering others until you get the right feel. I recommend doing this at the start of your track before you move forward with the rest of your composition and finer details.
 The What: